Battery switch on travel trailer function is crucial for managing power sources and maximizing battery life. This guide dives into the ins and outs of travel trailer battery switches, covering different types, installation, troubleshooting, and essential safety practices. We’ll explore how to connect shore power, a generator, and your trailer’s battery, ensuring you’re confident in managing your RV’s electrical system.
Understanding your battery switch is key to preventing electrical issues and enjoying hassle-free camping trips. We’ll break down the process step-by-step, making it easy to understand, even if you’re new to RV maintenance. From basic functionality to advanced troubleshooting, we’ve got you covered.
Understanding Battery Switch Functionality in Travel Trailers
A battery switch is a crucial component in any travel trailer’s electrical system, acting as a central control point for managing power from your trailer batteries. Understanding its function and different types is key to maintaining your RV’s power supply and preventing potential problems.
Battery Switch Purposes
The primary purpose of a battery switch in a travel trailer is to isolate and control the flow of power from your house batteries. This allows you to disconnect the batteries from the trailer’s electrical system when not in use, preventing parasitic drain (slow discharge of the battery even when not in use) and protecting sensitive electronics. It also allows you to select which battery bank (or banks) power various systems in your trailer, such as lights, appliances, and water pumps.
This is especially useful in trailers with multiple battery banks, often used for larger units or those with solar panels.
Types of Battery Switches
Several types of battery switches cater to different needs and configurations. A single battery switch is the simplest, managing only one battery bank. A dual battery switch controls two separate battery banks, often used for larger trailers or those needing separate power sources for different systems (e.g., one bank for house systems and another for starting the vehicle if the trailer is towable).
A three-way switch allows for the selection of either battery bank individually, both together, or a complete disconnection of both. More complex switches exist, allowing for even more granular control.
Internal Workings of a Typical Battery Switch
Most battery switches utilize a rotary mechanism with multiple positions. Internally, this involves a series of heavy-duty contacts that connect and disconnect based on the switch’s position. The switch is designed to handle high currents, and robust materials are used to ensure reliability and safety. Each position of the switch corresponds to a specific circuit configuration, directing power to the appropriate battery bank or isolating it completely.
These switches are usually robust and designed to withstand vibration and the harsh conditions of travel. Some modern switches include additional features like circuit breakers for added safety.
Installing a Battery Switch
Installing a battery switch requires basic electrical knowledge and appropriate safety precautions. Always disconnect the negative terminal of your batteries before starting any work.
- Choose the right location: Select a readily accessible location, preferably near your battery bank(s), but protected from the elements.
- Prepare the wiring: Run appropriate gauge wiring from the battery bank(s) to the switch, and from the switch to your trailer’s electrical system. Ensure the wire is adequately sized for the expected current draw.
- Mount the switch: Securely mount the switch using appropriate hardware, ensuring a firm and stable installation.
- Connect the wiring: Connect the positive cables from each battery bank to the corresponding terminals on the switch. Connect the output terminal(s) from the switch to the main power bus in your trailer’s electrical system. Double-check all connections for tightness and proper polarity.
- Reconnect the batteries: Carefully reconnect the negative battery terminals.
- Test the switch: Thoroughly test the switch in each position, verifying that power is routed correctly and that the batteries are properly isolated when necessary.
Remember to consult your trailer’s wiring diagram and follow all relevant safety guidelines during installation. If you’re not comfortable performing this task yourself, seek the help of a qualified RV technician.
Connecting and Managing Power Sources
Understanding how your travel trailer’s battery switch interacts with various power sources is crucial for safe and efficient operation. This section details how to connect and disconnect shore power, generator power, and battery power, emphasizing safety precautions throughout the process.
The battery switch acts as a central control point, allowing you to select which power source feeds your trailer’s electrical system. Improper use can lead to electrical damage or even injury, so careful attention to the instructions is paramount.
So, you’re an audiophile who travels? Awesome! Check out this guide for setting up your audiophile travel aetup – it’s got tips on packing your gear safely and efficiently. Then, once you’ve got your portable setup sorted, consider optimizing your listening experience with a dedicated travel-friendly headphone amp. For more advanced tips, explore another great resource on building the perfect audiophile travel aetup – it covers everything from noise isolation to finding the best portable DACs.
Happy listening on the go!
Battery Switch Wiring Diagram
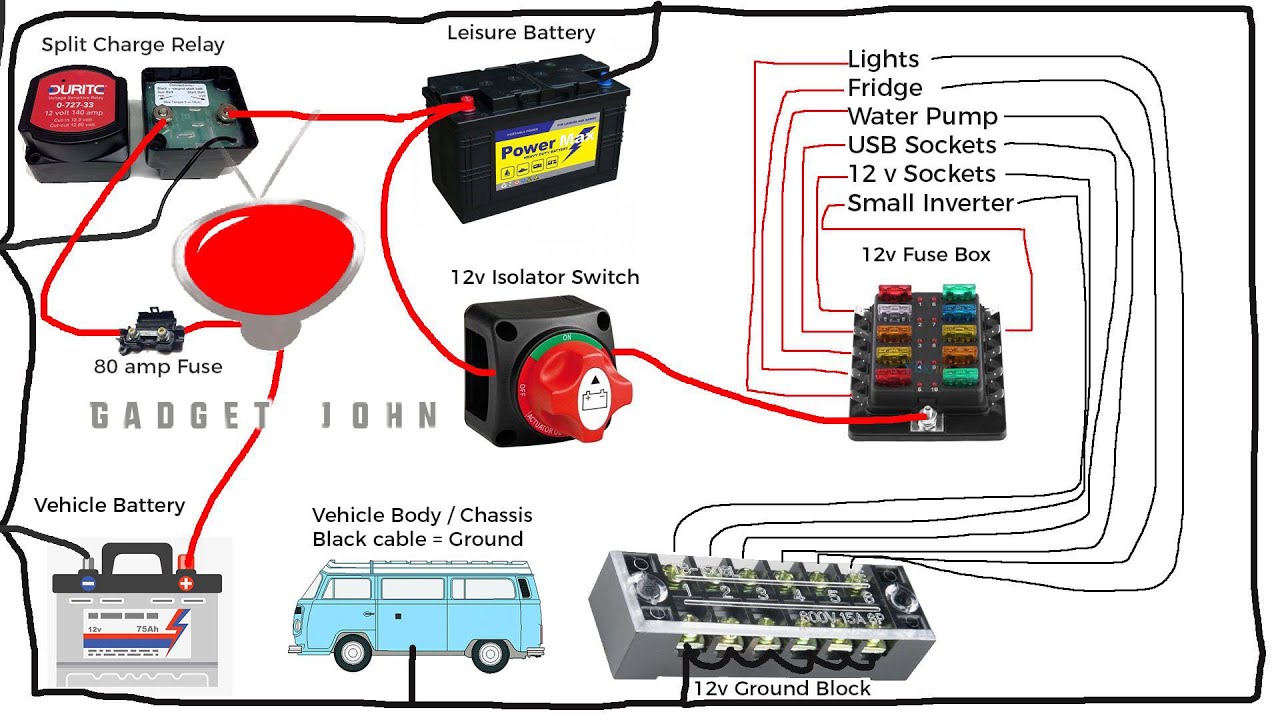
Imagine a simple diagram. At the top, you have your shore power connection (a 30-amp or 50-amp plug, depending on your setup). This connects to a shore power inlet on the trailer’s exterior. From there, a wire runs to the battery switch. The battery switch itself has multiple positions, usually labeled “Off,” “Battery,” “Shore,” and sometimes “Both” or “Combined”.
From the switch, another wire runs to the trailer’s distribution panel, which then feeds power to the lights, appliances, and other 12V and 120V systems. Below the switch, you have your trailer battery (or batteries), connected via thick cables directly to the battery switch. Finally, a separate wire runs from the generator (if equipped) to the battery switch. This allows you to select which power source to utilize, or even to charge the battery from the generator.
Connecting and Disconnecting Power Sources
Connecting and disconnecting power sources involves carefully manipulating the battery switch. Always turn off any appliances before switching power sources to prevent surges or damage. When connecting to shore power, ensure the switch is in the “Shore” position. For generator power, select the appropriate setting on the switch (usually “Shore” or a dedicated “Generator” position). To use battery power only, switch to the “Battery” position.
When disconnecting from shore power, always turn off the power at the pedestal before switching the battery switch to “Off” or another position. When using the generator, remember to follow your generator’s start-up and shut-down procedures.
Safety Precautions
Working with electricity requires caution. Always disconnect the negative (-) terminal of your battery before working on any wiring. Wear appropriate safety glasses to protect your eyes from sparks or debris. Use insulated tools to prevent accidental shocks. Never work on the electrical system while it’s energized.
If you are unsure about any aspect of your trailer’s electrical system, consult a qualified RV technician. Incorrect wiring can cause serious damage or injury.
Comparison of Battery Switch Types
Different battery switches offer varying features and levels of complexity. The choice depends on your needs and budget.
So, you’re an audiophile who travels? Awesome! Check out this guide for setting up your portable audio system: audiophile travel aetup. It’s packed with tips on packing your gear safely and efficiently. Then, once you’ve got your travel setup sorted, consider optimizing your sound in different environments. For some extra inspiration on creating the perfect soundscape on the go, browse this other resource on audiophile travel aetup – it offers some cool ideas on portable DACs and headphones.
| Battery Switch Type | Advantages | Disadvantages | Typical Applications |
|---|---|---|---|
| Simple 2-Position Switch | Simple, inexpensive, easy to install. | Limited functionality; only allows for battery or off. | Basic trailers with minimal electrical needs. |
| 3-Position Switch (Battery, Off, Shore) | More versatile than 2-position switches; allows selection of battery or shore power. | Still lacks combined power option. | Most common type; suitable for many travel trailers. |
| 4-Position Switch (Battery, Off, Shore, Both) | Offers combined power from battery and shore power; allows charging of batteries while running appliances. | More complex and potentially more expensive. | Travel trailers with higher power demands or those needing battery charging while on shore power. |
| Automatic Battery Switches | Automatically switches between sources based on voltage levels; convenient and often protects against battery drain. | More expensive; may require more complex installation. | Luxury trailers, trailers with sensitive electronics. |
Troubleshooting Common Battery Switch Issues
Your travel trailer’s battery switch is a crucial component for managing power, and problems with it can leave you stranded. Understanding common issues and how to troubleshoot them is essential for maintaining reliable power on the road. This section will guide you through diagnosing and resolving problems with your battery switch.
Common Battery Switch Problems
Several issues can arise with your travel trailer’s battery switch, often stemming from the harsh conditions they face. These problems can range from minor inconveniences to complete power failures. Addressing them promptly is vital for ensuring your RV’s functionality.
- Corrosion: Exposure to the elements, especially moisture and salt air, can cause corrosion on the battery terminals and the switch itself. This corrosion creates resistance, hindering the flow of electricity and potentially leading to a complete power outage.
- Loose Connections: Vibrations during travel can loosen connections at the battery terminals or the switch’s wiring. This can interrupt the electrical circuit and result in intermittent power or a total loss of power.
- Faulty Switch: Over time, the internal components of the battery switch can wear out or fail. This can manifest as an inability to switch between power sources or a complete failure of the switch mechanism.
Diagnosing Battery Switch Problems
Before attempting any repairs, it’s crucial to accurately diagnose the problem. A systematic approach will help you identify the root cause efficiently.
- Visual Inspection: Begin by carefully inspecting the battery switch and its connections for signs of corrosion, loose wires, or physical damage. Look for any green or white powdery residue on the terminals, which indicates corrosion. Check for any broken or frayed wires.
- Voltage Testing: Use a multimeter to check the voltage at the battery terminals and at the output of the switch. Compare these readings to determine if there’s a voltage drop indicating a problem within the switch or its connections. A significant voltage drop suggests a faulty connection or a problem within the switch itself.
- Continuity Test: With the multimeter set to the continuity setting, test the continuity of the wires and the switch itself. A lack of continuity indicates a broken wire or a faulty switch.
- Switch Operation Check: Try switching between different power sources (shore power, battery, etc.) to determine if the switch is operating correctly. If the switch feels stiff or doesn’t click firmly into place, it may be faulty.
Repairing or Replacing a Faulty Battery Switch
Once you’ve diagnosed the problem, you can proceed with repair or replacement.
Repairing a corroded switch: Cleaning corroded terminals and connections is often the simplest repair. Use a wire brush or terminal cleaner to remove corrosion. Apply a corrosion inhibitor to prevent future corrosion. Tighten any loose connections.
Replacing a faulty switch: If the switch itself is faulty, replacement is necessary. This typically involves disconnecting the wires from the old switch, carefully noting their positions, and then connecting them to the new switch in the same configuration. Ensure you use a switch with the correct amperage rating for your system. Consult your RV’s wiring diagram for assistance. Remember to always disconnect the negative battery terminal before working on any electrical components.
Troubleshooting Power Issues Flowchart, Battery switch on travel trailer function
This flowchart visually Artikels the steps to take when experiencing power issues related to your battery switch:
Start –> Visual Inspection (Corrosion, Loose Connections) –> Yes (Found Problem)? –> Clean/Tighten –> Test Power –> Power Restored? –> Yes (Problem Solved) –> End
No (Problem Not Found)? –> Voltage/Continuity Test –> Faulty Switch/Wiring? –> Yes (Faulty Switch/Wiring) –> Replace Switch/Repair Wiring –> Test Power –> Power Restored? –> Yes (Problem Solved) –> End
No (Problem Not Solved) –> Consult Professional –> End
Battery Switch and Energy Management
Smartly using your travel trailer’s battery switch is key to extending your battery life and avoiding frustrating power outages. Understanding how different appliances draw power and how to test your system will ensure you get the most out of your off-grid adventures.Maximizing battery life and efficiency relies heavily on understanding your power consumption habits and making informed choices about energy use.
This involves a combination of mindful appliance usage and regular system checks.
Battery Life Maximization Strategies
By strategically using your battery switch, you can significantly extend the lifespan of your batteries. Switching to shore power whenever available prevents unnecessary battery drain. Prioritizing essential appliances during off-grid use, and minimizing the use of high-drain items like air conditioners, will conserve battery power. Regularly checking your battery voltage with a multimeter (discussed later) helps you monitor their health and anticipate when charging is needed.
Furthermore, fully charging your batteries before extended periods of storage will prevent sulfation and prolong their overall lifespan.
Appliance Energy Consumption Comparison
Different appliances consume varying amounts of power, and the energy source (shore power vs. battery) impacts their performance. For example, a microwave oven draws significantly more power than a small LED light. Running the microwave on battery power might quickly deplete your batteries, whereas the LED light would have a negligible effect. Shore power, being a constant and robust supply, allows for the use of more power-hungry appliances without worrying about battery drain.
Using a portable generator to supplement battery power can extend your off-grid capability but adds the complexity of fuel management and noise. Understanding these differences allows for informed decision-making on appliance usage, based on available power sources.
Battery Switch and Related Component Maintenance
Regular maintenance is vital for ensuring the reliable operation of your battery switch and related components. This includes:
- Visually inspecting the switch and wiring for any signs of corrosion, damage, or loose connections.
- Cleaning the battery terminals regularly to remove corrosion buildup, improving conductivity and preventing voltage drop.
- Checking the battery cables for wear and tear and replacing them if necessary.
- Periodically lubricating the battery switch mechanism (if applicable) to ensure smooth operation.
- Testing the battery switch functionality regularly using a multimeter (detailed below).
Ignoring these maintenance tasks can lead to premature failure of components, resulting in power outages and potentially costly repairs.
Multimeter Testing of the Battery Switch and Connections
A multimeter is an invaluable tool for testing the battery switch and its connections. Here’s how to test the switch:
- Safety First: Always disconnect the negative battery terminal before performing any electrical tests.
- Set the Multimeter: Set your multimeter to measure DC voltage. A typical setting would be 20V or Auto-range.
- Test Battery Voltage: Connect the multimeter’s probes to the positive (+) and negative (-) terminals of your battery. Note the reading; this is your battery’s voltage. A fully charged 12V battery should read around 12.6V or slightly higher.
- Test Switch Connections: With the battery switch in the “Battery” position, connect the multimeter probes to the output terminals of the switch. The reading should be close to the battery voltage. A significant voltage drop indicates a problem with the switch or wiring.
- Test Switch in “Off” and “Shore Power” Positions: Repeat step 4 with the switch in the “Off” and “Shore Power” positions. In the “Off” position, the reading should be close to zero. In the “Shore Power” position, you should not get a reading from the battery side.
- Inspect for Voltage Drops: If you find a significant voltage drop across any part of the circuit, carefully inspect the wiring and connections for corrosion, loose terminals, or broken wires.
Remember, always consult your travel trailer’s manual for specific instructions and safety precautions. If you are unsure about any step, seek assistance from a qualified electrician.
Safety and Maintenance
Proper use and maintenance of your travel trailer’s battery switch are crucial for safe and reliable operation. Neglecting these aspects can lead to serious consequences, including electrical shocks, fires, and damage to your RV’s electrical system. This section details the potential hazards, proper wiring techniques, and a maintenance schedule to keep your system running smoothly and safely.
Potential Hazards of Improper Battery Switch Use
Improper use of the battery switch can result in several dangerous situations. Connecting batteries incorrectly can cause sparks, leading to fires, especially in the presence of flammable materials commonly found in RVs. Touching exposed wires or terminals while the system is energized can deliver a potentially fatal electric shock. Furthermore, incorrect switching can lead to parasitic drain, slowly depleting your batteries and potentially leaving you stranded without power.
Finally, overloading the system by connecting too many appliances or using incorrect amperage fuses can cause overheating and fire hazards.
Proper Wiring Techniques and Connection Points
Safe wiring is paramount. A typical setup involves a battery switch connecting the house batteries to the RV’s 12V system. The switch itself should be securely mounted in a well-ventilated, easily accessible location, away from moisture and potential sources of impact. The positive (+) cables from each battery should be connected to the appropriately labeled positive terminals on the switch using appropriately sized, heavy-duty battery cables with corrosion-resistant terminals.
Similarly, the negative (-) cables from each battery should be connected to the negative terminals on the switch. Crimp-on connectors should be used for all connections, ensuring a tight and secure fit. The output from the switch should then connect to the 12V distribution panel of your RV, again using properly sized cables and connectors. Always use appropriately sized fuses or circuit breakers at the appropriate points in the circuit to protect against overloads.
A visual example: Imagine a three-way battery switch. Each of the two battery terminals on one side will have a heavy gauge wire running directly from the positive terminal of each battery, secured with a sturdy crimp connector. The same process is used for the negative terminals. On the other side of the switch, the output terminals will have similarly secured cables running to the RV’s 12V distribution panel, which should also be fused.
Routine Maintenance Schedule for the Battery Switch and Components
Regular inspection and maintenance are essential to prevent problems. Inspect the battery switch and all connections monthly, looking for signs of corrosion, loose connections, or damage to the cables. Clean any corrosion from terminals using a wire brush and a battery terminal cleaner. Tighten any loose connections. Inspect the fuses or circuit breakers to ensure they are the correct amperage and haven’t blown.
Replace any damaged cables or connectors immediately. Annually, consider having a qualified RV technician inspect your entire 12V system, including the battery switch, to ensure everything is functioning correctly and safely.
Battery Switch and Related Electrical Systems Inspection Checklist
Before each trip, perform a quick visual inspection. This checklist will aid in ensuring the safe and proper functioning of your battery switch and related electrical systems:
- Visually inspect the battery switch for any signs of damage or corrosion.
- Check all connections for tightness and corrosion.
- Inspect the battery cables for any signs of wear or damage.
- Verify that the fuses or circuit breakers are correctly sized and not blown.
- Ensure the battery switch is in the correct position (ON or OFF) depending on your needs.
- Test all 12V systems (lights, water pump, etc.) to confirm proper operation.
Mastering your travel trailer’s battery switch unlocks a world of reliable power management. By understanding its function, performing regular maintenance, and knowing how to troubleshoot common problems, you’ll ensure smooth and safe adventures on the road. Remember, safety is paramount; always disconnect power before working on any electrical components. Happy travels!
FAQ Compilation: Battery Switch On Travel Trailer Function
What happens if my battery switch is faulty?
A faulty switch can lead to power loss, battery drain, or even electrical hazards. Symptoms include no power to appliances, flickering lights, or a blown fuse.
How often should I inspect my battery switch?
Regularly inspect your switch, at least once a season, checking for corrosion, loose connections, and damage.
Can I use a battery switch with different battery types?
Most switches are compatible with common RV batteries (lead-acid, AGM, lithium). However, always check your switch’s specifications to ensure compatibility.
How do I clean corrosion from my battery switch?
Disconnect the power first! Then, use a wire brush and baking soda solution to clean the terminals and switch contacts.
